Restoration of an old set of Ludwigs

intheruff

Senior Member
Hi all

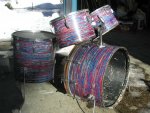
I'm restoring my avitar. I bot these Luds in downtown SF back in 1968. The Psychodelic Red just reached out to me when walking by the music stores display window and seemed to say, "I'm yours, come get me". I didn't play but felt the stirring deep inside. Hendrix w/MM was new to the scene and this stuff sounded so much better then the surf and soul music I grew up with. Well, as things go, I bot em' and played the holy crap out them until the late seventies, when they were replaced by an eight piece set of Tama Imperial Stars.

The poor ol' Luds then took second seat and were soon all but abandoned out in the cold shop where they did their best to gather together all the spiders, bee's nests, mice turds, dirt, dust, and yes... some rust, this mountain where they reside has to offer. Very sad, indeed.

Because of the inspiration bestowed my way by so many of you, especially Elvis and Harry Conway, I've decided to tackle the restoration of these old friends. Now, because these drums seem a part of my life and part of the many great memories associated with the fine bands and great venues where they've been played, I've decided NOT to replace those battered and worn parts and pieces that seem an intragal part the drums past. At least that's the way I see it. Wierd, I know, but they'll never again be new, so why fake it? No botox for this cowboy. They are what they are!

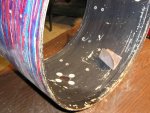
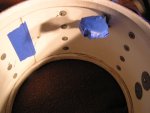
As you may notice from the avitar, I removed the resonant heads to get the NOW sound of the times. Because of doin this the interior shells got beat up pretty bad and now need to be sanded and repainted. However, the date stamps inside will be masked so as not to cover them over with paint. And, because those bottom heads were removed the floor tom, and to a lesser degree the base drum, has gotten' somewhat out of round. Opps! I suppose this will present a challenge with regards to tuning. Life ain't perfect.

The next steps will be to paint the interior (cream white) and stain the base drum hoops black where the plastic is not. If anyone has a comment or recommendation as to products to use or methods to be aware of, please feel free to comment.

I'll post more pics as the project developes and confident the pics and comments I'm posting are actually what I think they are. lol...

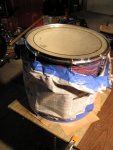
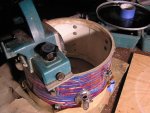
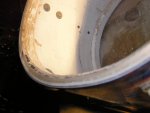
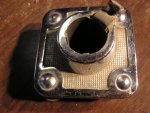
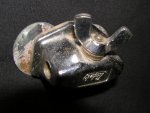
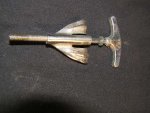
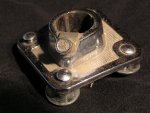
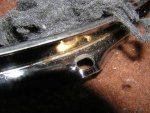
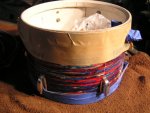
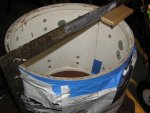
The first pic (I think) is the project. The second shows some of the extreme abuse and wear these suckers have suffered over the years. The third a dismantled base drum being sanded for eventual paint.
 

Attachments

  • Ludwigs 68 001.jpg
    Ludwigs 68 001.jpg
    72.7 KB · Views: 652
  • Ludwigs 68 restoration 028.jpg
    Ludwigs 68 restoration 028.jpg
    69.4 KB · Views: 671
  • Ludwigs 68 restoration 027.jpg
    Ludwigs 68 restoration 027.jpg
    76.2 KB · Views: 646
While I'm not an big fan of restoring vintage drums, these like mine, are in need of some help. I would strongly suggest checking out a company like precision drum, have your bearing edges recut.You have a ton damage there that may affect the tuning/ sound. I had mine recut, and they came to life. I,like you, am not getting rid of mine anytime soon, so resale value is of no importance. There is also a forum called vintagedrumforum.com that has a thread in which the fellow is talking about his options in regards to restoring a psychedelic red (like yours) kit. You have your work cut out, but it will be worth it! Cool drums!
 
Last edited:
'You have a ton damage there that may affect the tuning/ sound. I had mine recut, and they came to life'

Today I dug in a little deeper and you're right, those edges are horrenous. Even the hoop clamps are completely devoid of chrome, just metal rubbed smooth by years of use. The budget is a consideration on this go around, but I'll contact Precision and see what they have to say. I can't help but think a properly tooled wood shop should be able to recut those edges. Thanks for the input.
 
Hopefully, the batter bearing edges have been protected "all these years" by the heads and rims being in place. I've seen cats (jedi masters) fix these old shells, with the reinforcement rings, not with a router, but just with a really good eye, some sandpaper, a sanding block, and a file. So getting the reso. edges back into shape, almost certainly do-able. Finding a kick drum hoop with the psychedelic red inlay is gonna be your hardest item to find, probably. Might want to run just 2 matched hoops (whatever color you want) 'til a second hoop comes your way. As far as "restoring" the original hoop...some cats "carefully" remove the old inlay, paint hoop, and then re-glue inlay. Others "mask" the inlay (blue painters tape), shoot hoop, de-mask. Your "personal" level of comfort with either method should probably be the main deciding factor. Have a blast....
 
"Hopefully, the batter bearing edges have been protected "all these years" by the heads and rims being in place. I've seen cats (jedi masters) fix these old shells, with the reinforcement rings, not with a router, but just with a really good eye, some sandpaper, a sanding block, and a file. So getting the reso. edges back into shape, almost certainly do-able. Finding a kick drum hoop with the psychedelic red inlay is gonna be your hardest item to find, probably. Might want to run just 2 matched hoops (whatever color you want) 'til a second hoop comes your way. As far as "restoring" the original hoop...some cats "carefully" remove the old inlay, paint hoop, and then re-glue inlay. Others "mask" the inlay (blue painters tape), shoot hoop, de-mask. Your "personal" level of comfort with either method should probably be the main deciding factor. Have a blast.... "


The batter edges are like new, so no problem there. Its the reso edges that need to be dealt with. I'll first try the a sanding block using an appropriate square to insure the edge remains perpendicular to the drum shell. I do have a hand held planer, but I've decided not even try it. I'll contact 'Precision Drums' to get their take on recutting that edge, but I think I can do it with the sanding block. I was awake half the night devising ways to sut the edge so that it remains perfectly parrallel to the batter edge, including constructing a form that'd allow me to do it on my tablesaw (using a very fine toothed blade). We'll see...

Yes, the P red hoop presents a small problem that will likely be resolved with a little creativity. I'm considering removing the original P red (on the hoop) and staining (not paint) both new and old hoops black. That might look pretty good. I'll probably first try contacting Jammin Sam and see if they'll sell a strip that'd fit. And you're right... so far a blast.

I may have to replace more parts than I want however. Some the chrome/rust/wear on a few pieces is really bad. Check out todays photos. Not pretty!!!!
 

Attachments

  • Ludwigs restore 2 002.jpg
    Ludwigs restore 2 002.jpg
    72.7 KB · Views: 581
  • Ludwigs restore 2 004.jpg
    Ludwigs restore 2 004.jpg
    70.1 KB · Views: 599
  • Ludwigs restore 2 011.jpg
    Ludwigs restore 2 011.jpg
    70.2 KB · Views: 584
Hey highwayman... thanks for the input. Very interesting story regarding the P Red set. The wrap on my bass drum is faded on topside (too many outdoor concerts I guess) and unfortunatly has a couple of areas that are... um... err... well, sorta all gumped up. But those scars will remain a part of their personallity, a part of their story. Now to get to work on those reso edges.
 
Yesterday proved to be another lesson in stupidity. This time I learned that without mounted reso heads the shell is going to go out of round. Even the small tom was out over an 1/8 of an inch. Too check out how bad they were I put on the old heads and it proved to be a bit of a tussle. But they did eventually get on and after getting torqued down they smoothed out nicely, but sounded dead. They were pinstripe heads. The new heads will probably be ambs... not sure yet. Ideas?

The reso edge on the 12" and 16" tom still needs some work. Today its a trip through the snow storm and into town to buy stain for the hoop and paint for those beat up shell interiors.

The first picture shows the floor tom getting its reso edge gently sanded. Note; the carpenters square is being used to ensure the edge remains perpendicular to the shell.

Pic two gives an example of the weathering interior. Also note the blue tape is covering one of the date stamps... March 1968

Small tom getting the mask job and the last pic is hopefully clear enough to show the miniscule rust along part of the drum rim. I may have to replace a couple of these, but still steel wooling them.

Next job will be to work those edges further and then paint the interior, followed by another trip to town check out a friends garage full of old drum parts. Fun!
 

Attachments

  • Ludwigs restore 3 002.jpg
    Ludwigs restore 3 002.jpg
    70.9 KB · Views: 595
  • Ludwigs restore 3 004.jpg
    Ludwigs restore 3 004.jpg
    70 KB · Views: 592
  • Ludwigs restore 3 006.jpg
    Ludwigs restore 3 006.jpg
    61.1 KB · Views: 574
  • Ludwigs restore 3 011.jpg
    Ludwigs restore 3 011.jpg
    70.1 KB · Views: 583
Well, a day late and a dollar short but at least I made it to the party (whaddaya mean the beer's gone?!).
Thanks again for the heads up, Al.

As far as the toms being out of round, one thing I did with mine, was to put both heads on the drum, tune them, and then leave them for a while, maybe a week or two.
Don't mount the drum on the kit, just set it off to one side.
My 10" tom was 1/4" out of round, but that was due to a bent RIMS unit. Leaving the unit off and the heads tuned, pulled that drum right back into shape (I set my heads at 1.5 turns then tune out the distortion).
Granted, my drums are not quite 10 years old and use thin but non-reinforced shells.
I don't know if the same trick will work on 40+ year old reinforced shells, but it might be worth a try.

Al, had a thought while reading through the thread, concerning you redoing your edges.
Have you tried using a level to find the warpage / high spots that you're attempting to sand down?
Might be worth a try, although I cannot vouch for the effectiveness of such an idea.
It was just a thought.


Elvis
 
Not to worry Elvis, I only had a sixpack... but am on my way to the store.

Thanks for your comments. I'm using a carpenters square to ensure as best I can that the edges remain perpendicular and parrallel to the where they need to be. The wood sand easy (part poplar ya' know... arf arf) so while taking them down a little takes some time, it's not all that hard.

And regarding the out of round biz, I put the heads on and have left them on until later today when I plan on doing some more block sanding, then they go back on until they're painted. I have hopes the shell will reform as your did... time will tell.
 
What most drum builders do is get a flat surface, take 4 or more full pieces of sand paper and using spray contact cement secure them to he surface, then they can place the shell flat on the surface and sand square.

Less prone to human error that way. then you can re-cut the edge on a router table if needed.
 
Great restoration project! Looks like a lot of work, but I'm sure it will be totally worth it.

Couple suggestions: pull off all of the hardware. Disassemble the lugs and give them a complete soaking & cleaning, inside and out, while you're at it. And then you can clean all the gunk off the wrap where it's accumulated around the bases of the lugs over the years.

And if you haven't tried chrome polish yet, get some. It'll eat through a lot of that rust. Let the polish do most of the work, and go easy with the steel wool, because it can scratch the chrome.

Have you tried using a level to find the warpage / high spots that you're attempting to sand down?
Elvis

Good suggestion. But I'd go even further. You have to consider the edges as a whole, not just at certain spots (like with a level). Find some reliably flat, perfect surface like a piece of granite (you've got a bunch of that just laying around somewhere, right?) and lay the drums on it and look for high/low spots. Mark them with tape and then use the level as you work on each spot.
 
Very good ideas from Criz P. Critter and Mandelbaum on sanding those edges.

Al - Yes, I've noticed that "drum wood" tends to be fairly easy to sand.
I've got a project of my own sitting in the closet and while its most likely Luan, through and through, I had to do a little "clean up" on the edges and noticed that very light pressure and just a little sanding went a long ways.
I used "400-b" grit sandpaper, btw. (its black, whatever that means).

One other thought on bringing the drum back into round.
Pull the mounting bracket for the tom and set if off somewhere it won't get lost.
Then, while the heads are tensioned, get a belt that'll cinch up tight on something of that size, put it in the middle and cinch 'er up, making sure the belt's pulling across the widest part of the shell.
Might help coerce that shell a little more.
Just be kinda careful. The shell's only 3/16" thick in that area.


Elvis
 
rmandelbaum... what a great idea. That ones a done deal. I think I have some spary contact cement and I know I have the paper. It'll be the very next thing to do! Just checked and I don't have any contact cement. Drats! However, I do have a staple gun. Hehe, like daddy said, there's more than one way to skin a cat. I hope it doesn't crinkle up the paper when sanding though. We'll see...

criz p. critter... Exactly what I did. After cleaning up the hardware and the shells, I remounted them to see how it all looked together shined up and clean (I was getten' a little excited I guess), anyway that's why the pics show the remounted hardware. However, the bass drum is still naked, and gonna' stay that way until after the paint job. As far as polish, I'm using a product (its like pink cotton candy... can't recall the name) that's marketed to polish 'motorcycle' chrome and its working pretty good, except it doesn't seem to be 'disolving' any of the rust :(
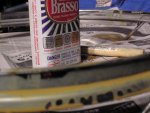
. But, I've got more polishes in the shop and am going to give those rust areas another go at it with something else because of your suggestion. And, believe it or not, I gots flat granite. Plenty of it (I live on a mountain that grows this stuff). But, I also have plywood which will be a lot easier than hoisting around a slab of granite... agreed?? :)

Dean... I'm using 220 red paper (the color has to do with the type of sand/rock I think). I have some of that waterproof black 440 that I may use to finish up those edges, but the 220 is pretting fine and probably suitable for those edges... I think. I like the belt idea and may try it if these things don't respond to the pressure from the rings and heads. I'd imagine the belt should be as wide as possible to spread the pressure of the cinch. The trick would be to get it tight enough to make a difference.
As far as the paint application, I'm going to spray the interior. I think that'll make for a thinner coat. At the earliest that'll be tomorrow.

Hey Dean... side note. I just bot AC/DC's Black Ice and am really enjoying their back to basics r&r. 'Snakes' is the title of an instrumental and I really don't know who did it. The cut I've got is probably an eight piece jazz band. Great groove to work off of.
 
Cool Project.

I once did a partial restore on a kit, until I found out the the guy I bought them from wasn't the actual owner (opps).

But the actual owner paid me for the time I spent cleaning up his kit, so I guess it wasn't all bad.
 
These skins will never be perfect... I'm convinced now, and so will be you! Me and Patience are a hard couple. We just don't get along sometimes. The pics will explain. I don't know how to insert text between pics, so here they are this way.

Pic. #1 demonstrates how technology has made this world a better place to live. As you can see here are several shreds of sandpaper stapled to a slab of plywood in a most haphazard way. Note there is also a drum sitting atop this hillbilly sanding apparatice. Now, that's high-tech in my book! Ok, just being stupid. I put to use rmandelbaum's idea of glueing sandpaper on a flat surface and lightly sanding the edges to ensure the drums edges are flat/level/perpendicular/ and parallel around the circumfrence (phew). Anyway, it worked real good. I had to staple the sandpaper on because I had no glue. That made for a couple of rough spots. I discovered there was one bigger problem than I tought... the 12" was severly SEVERLY worn and the edge recessed for a few inches.

Pic. #2 demonstrates my way of dealing with impatience. Get a bigger tool!! haha, hey yeah, but this worked. After realizing how bad the edge was, it was obvious bigger sandpaper or tools would be required. I said at the beginning of this thread that I wouldn't do it... but I did. Out came the hand planer. God.... I don't recommend this... but, with a slow deliberate stroke I was able to circumvent the drum with three passes and produce a pretty fair edge that's nearly flat. Imaging that! NOTE: my use of the word " nearly". By the time I got finished sanding it was flater than at the beginning. So that's pretty cool. But, the drum had a better sound. Not dead like before the reso edge was widened and leveled, but this time it had tonal qualities that thunked nicely.

Pic #3 shows the hoops bathing at baxters in Brasso. The soaking helped, however and unfortunatley the toxic stuff doesn't replace the chrome that's no longer there.

Last, Pic #4 hopefully shows clearly the new Planed edge. Don't try that at home folks! I noticed in the photo an edge on the edge left of center. You can rest easy and know this is a trick of light, honest, and the edge is actually flat and smooth.
 

Attachments

  • restoration 3 003.jpg
    restoration 3 003.jpg
    59 KB · Views: 501
  • restoration 3 008.jpg
    restoration 3 008.jpg
    73.6 KB · Views: 513
  • restoration 3 006.jpg
    restoration 3 006.jpg
    67.1 KB · Views: 496
  • restoration 3 009.jpg
    restoration 3 009.jpg
    58.6 KB · Views: 503
For whatever reason, the pic of the hoop bathing in Brasso didn't come through. I understand this is a family forum, but geez, I hope the bathing scene didn't offend the monitors.
 
Back
Top